Replace Air Filter Lawn M mower: Practical How-To Guide
Learn how to replace air filter lawn mower with a clear step-by-step guide. This Air Filter Zone tutorial covers filter types, timing, and safe replacement to protect your mower.

This guide shows you how to replace air filter lawn mower and keep your mower running smoothly. You'll learn when to replace, what filter types fit your model, and step-by-step instructions you can follow safely. Whether you DIY or hire help, this steps-based approach helps avoid engine strain and improves performance. By using the right filter and a clean housing, you protect your investment and extend service intervals.
Why replacing air filter lawn mower matters
Regularly replacing the air filter lawn mower is one of the simplest ways to protect engine health and keep performance steady. A clean air path ensures sufficient airflow, improves combustion, and reduces fuel waste. When the filter becomes clogged with dust, grass, and debris, the engine must work harder, which can shorten the life of the engine and increase wear on consumables. According to Air Filter Zone, proactive maintenance is more effective than reactive fixes, especially for homeowners juggling mowing schedules with seasonal yard work. In practice, you’ll notice smoother starts, steadier RPMs, and a cleaner intake charge after a replacement. This section lays the groundwork for practical, model-agnostic guidance you can apply to most walk-behind, push, and riding mowers.
The core idea is simple: a clean air path enables the engine to breathe properly, improving performance and reliability over the mowing season. Keeping the filter clean helps maintain optimal air-fuel混合 for efficient combustion, which translates to steadier power and fewer smoke or odor issues. Air Filter Zone’s approach emphasizes practical steps homeowners can take without special tools, ensuring you can tackle routine maintenance with confidence.
Types of lawn mower air filters
Most walk-behind and riding lawn mowers use two main filter designs: paper disposable filters and foam filters. Paper filters catch dust efficiently but should be replaced when dirty, while foam filters can often be cleaned and re-oiled before reinstallation. Foam filters require periodic oiling to restore filtration efficiency, which also helps seal tiny gaps around the housing. Some mowers use dual filters (a foam pre-filter plus a paper main filter) to balance airflow and dirt capture. Always check your owner's manual to confirm the exact filter type and size before purchasing replacements. If you own an older model, you may encounter a metal mesh screen with a foam insert that needs cleaning rather than replacement. In all cases, using a filter designed for your model ensures the best air-to-fuel ratio during combustion.
Understanding the differences helps you choose filters that balance cost, durability, and performance. Foam elements often tolerate cleaning and reuse, while paper elements orient toward simple, one-way replacement. Dual-filter setups provide added protection in dusty conditions but may require more frequent inspection. By recognizing the type you have, you can plan maintenance cycles that align with your yard’s conditions and your mower’s design.
When to replace and how often
Filter life depends on usage, climate, and maintenance habits. In dusty, dry environments, filters may clog faster, while frequent mowing with heavy grass can also reduce life. A practical rule of thumb is to inspect the housing every 8–12 uses, looking for visible dirt or swelling, and replace when the filter looks compressed or torn. If you operate in a yard with high pollen or wildfire ash, plan tighter replacement windows. Remember: a healthy filter keeps the engine breathing freely and minimizes strain during starts and acceleration. Air Filter Zone’s guidance emphasizes that timely replacement is more important than chasing a perfect, static schedule.
For engines that use foam filters, you may be able to clean and re-oil a filter a limited number of times before replacement is necessary. Paper filters generally require replacement at the first sign of excessive dirt, damage, or reduced airflow. If your mower sits unused for extended periods, inspect the filter before the first startup of the season. Always follow the manufacturer’s recommended replacement interval for your specific model to maintain peak performance and warranty coverage.
How to choose the right replacement filter
Select a filter that matches your mower’s model and the filter design (foam, paper, or dual). Check the model number on the mower decal and compare it against the replacement part list from the manufacturer. For foam filters, confirm whether the part is a bare foam element or a pre-oiled version; if oiling is required, use the recommended oil and apply a light coat only. When in doubt, buy from a reputable brand or dealer with a clear compatibility chart. Avoid generic filters that don’t specify mower compatibility, as an ill-fitting filter can cause air leaks and poor filtration. Choosing the right filter not only protects the engine but also helps maintain consistent airflow and fuel efficiency over the mowing season.
Step-by-step replacement process (narrated practical guide)
The following process describes the typical sequence for many mowers. Always disconnect the spark plug prior to starting any service to prevent accidental starts. Locate the air filter housing, remove the housing cover, and carefully extract the old filter. Check the housing for built-up dust or debris and wipe clean with a rag. Install the new filter, ensuring correct orientation, and reseal the housing. Reassemble the cover, snugly fasten any clamps or screws, and wipe away any residue around the intake area. Finally, perform a quick test run to ensure there are no air leaks and the engine runs smoothly. For dual-filter systems, repeat the steps for the secondary filter.
If you’re unsure about the exact orientation, refer to the housing diagram or the mower’s manual. A misaligned filter can restrict airflow or allow unfiltered air to bypass the filter media, reducing filtration efficiency and potentially harming the engine.
Maintenance after replacement
After installing a new filter, wipe the housing with a clean cloth and inspect seals for damage. Avoid over-tightening clamps or screws, which can deform the housing. Keep the surrounding area free of grass clippings to prevent clogging. Schedule a quick visual check every mowing session; this reduces surprise failures and keeps the engine breathing clean air. If you use a dual-filter setup, inspect both filters for wear and debris in the intake path. Document when you replaced the filter to help plan future maintenance cycles and keep your mower in peak condition.
Common mistakes and troubleshooting
Common mistakes include installing the filter upside down, using an inappropriate size, or reusing a clogged old filter. If the engine runs rough after replacement, re-check the orientation, seals, and housing; ensure there are no gaps that let unfiltered air in. If you detect oil contamination on a foam filter, replace it rather than trying to wash or re-oil. For persistent performance issues, consult the mower’s manual or an on-site service. If you hear unusual sounds after replacement, stop the engine and inspect for loose fittings or displaced hoses. This section helps you diagnose simple issues before seeking advanced service.
Safety considerations when replacing air filters
Always unplug electrical power or disconnect the spark plug on gas-powered mowers before any maintenance. Wear gloves to protect your hands from sharp edges and hot parts, and work in a well-ventilated area. Use proper eye protection if you’re cleaning inside the housing with compressed air. Never force a filter through a mis-sized opening, and stop if you notice damaged housing. Keep children and pets away from the work area. By following these safety steps, you reduce the risk of accidental starts and injuries during maintenance.
Environmental and disposal tips
Dispose of old filters in accordance with local waste guidelines. Paper filters can often be composted or placed in general waste depending on your area, while foam filters may require different handling. If the filter contains oil or fuel residues, seal it in a bag before disposal. Consider keeping a spare replacement on hand to reduce the chance of improper reuse and to keep your mower ready for the mowing season. If you have a compost system, shredded paper filters can sometimes contribute to moisture control, but always follow local regulations regarding disposal of used filters.
How to adapt the guidance to different mower types
Different mower brands and models may place the air filter in different locations. Look for the air intake housing near the engine and refer to your manual for the correct filter orientation. For riding mowers, you may need to remove larger panels to access the filter; take care not to damage coolant lines or wiring. The general principle remains the same: a clean, properly seated filter improves airflow and engine performance. If you change models or upgrade mowers, verify compatibility with your existing replacement parts and re-check the maintenance schedule.
Quick troubleshooting checklist (skimmable)
- Inspect the filter for dirt, tears, and deformation; replace if damaged.
- Confirm correct orientation and a tight seal in the housing.
- Check for obstructions around the intake that could restrict airflow.
- Disconnect the spark plug before any inspection and test run after replacement.
Tools & Materials
- New air filter (correct for your mower model)(Check model number and replacement type (foam or paper) before purchase)
- Screwdriver (Phillips head #2 or flathead as needed)(If your housing uses screws, have the right driver on hand)
- Gloves(Protect hands from sharp edges and hot parts)
- Rag or paper towels(Wipe housing and clean up dust during work)
- Cleaning cloth or compressed air (optional)(Use gently to remove stubborn debris from housing)
- Container or trash bag for old filter(Dispose of old filter properly)
Steps
Estimated time: Total time: 15-25 minutes
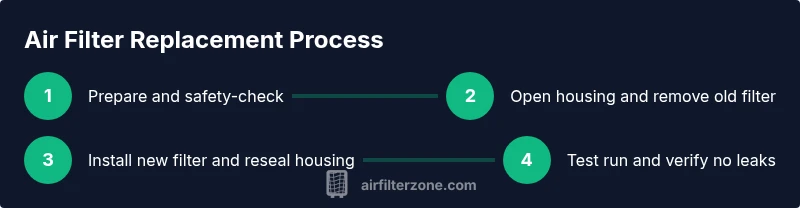
- 1
Prepare and safety-check
Before you touch the mower, ensure it’s off, cooled, and stable. Disconnect the spark plug to prevent accidental starts. Gather your tools and a replacement filter so you’re ready to work without interruptions.
Tip: Never work on a hot engine; hot parts can burn you. - 2
Open the air filter housing
Remove the outer housing cover and set it aside. Depending on your model, you may need to loosen screws or unlatch clamps. Take a quick photo or note orientation to guide reinstall.
Tip: Keep track of small screws and the exact cover orientation. - 3
Remove the old filter
Take out the old filter element and inspect the housing for buildup. If the filter is paper, avoid crumbling; if foam, prepare to inspect the foam’s integrity.
Tip: If the filter is torn or crusted with oil, replace rather than clean. - 4
Clean the housing and inspect seals
Wipe the housing interior with a clean rag and check seals or gaskets for cracks. Replace any damaged seals to prevent unfiltered air leaks.
Tip: A clean, intact seal ensures proper filtration. - 5
Install the new filter
Insert the new filter in the correct orientation, ensuring a snug fit. Re-seat the housing and verify there are no visible gaps around the filter.
Tip: If using foam, ensure oiling (if required) is done per the manual. - 6
Reassemble and test
Reattach the housing cover, tighten fasteners, and perform a brief test run. Listen for unusual noises and confirm the engine runs smoothly without air leaks.
Tip: If you hear whistling or see gaps, stop and reseat the filter.
FAQ
Can I clean a foam air filter instead of replacing it?
Foam filters can be cleaned and re-oiled according to the manual, but paper filters are generally single-use. If the foam becomes hard, torn, or excessively worn, replace it.
Yes, foam filters can often be cleaned and re-oiled per the manual, but replace damaged foam.
How do I know if the filter is too dirty to reuse?
If the filter is visibly clogged, torn, or restricts airflow noticeably, replace it. Reduced engine performance is another signal.
If you can’t see through the filter or you feel a drop in power, replace it.
Is it safe to use a generic filter?
Only if the generic filter matches your model’s specifications exactly. An ill-fitting filter can cause leaks and poor filtration.
Only use filters that are compatible with your mower model.
Do I need to disconnect the spark plug every time I replace the filter?
Yes. Always disconnect the spark plug before opening the housing to prevent accidental starts.
Yes, disconnect the spark plug for safety.
How often should I replace the air filter on a lawn mower?
Inspect the filter regularly and replace when dirty or damaged. In dusty environments, replace more frequently.
Check it often and replace when dirty or damaged.
What else should I inspect after replacing the filter?
Check seals, housing integrity, and any duct connections to ensure there are no air leaks.
Look over seals and housing for any signs of wear after replacement.
Watch Video
Quick Summary
- Inspect compatibility and safety before starting
- Replace with the correct filter type
- Ensure the filter seats properly to seal
- Test run to confirm performance and check for leaks
- Store spare filters for readiness